loeken
May 3, 2021
My Homesetup
0. hello world - goals
Hi there, I’m loeken - I work as a devops engineer - so i have the great job of playing with various tech stacks for a living. At work my life mostly focuses around the cloud - but in this guide the goal is to rather host stuff on our own with some main goals:
- I own MY data ( this does not necessarily mean inconvinience )
- Security by Compartmentalization
- Combine the best of KVMS(proxmox) and Containers(k3s)
- Easy to maintain ( ansible )
- Update home stack to debian 11 - release date 2021-08-14 ( https://lists.debian.org/debian-devel-announce/2021/07/msg00003.html )
At first glance it might look a bit overkill and maybe even frightening to some people, but once it’s setup properly it isn’t complicated to use. If you run a small business/office/company you could apply the same principles, and maybe add some further network seggregation between your departments.
0.1. prerequisites & principles
0.1.1. ssh keys
passwords are not bad, but keys are better ( and in my opinion also more convenient ). so whenever we setup ssh or connect via ssh we want to use a ssh keypair. if you don’t have an ssh keypair yet generate one:
❯ ssh-keygen -t rsa -b 2048
Generating public/private rsa key pair.
Enter passphrase (empty for no passphrase):
Enter same passphrase again:
Your identification has been saved in tutorial
Your public key has been saved in tutorial.pub
The key fingerprint is:
SHA256:vl6f9UHs7nIAmOF9jEIJcNNf5vQZ91LmDhhjdobxErE loeken@0x00f
The key's randomart image is:
+---[RSA 2048]----+
|     ..+o . ++   |
|      . .=  *Bo.+|
|        o *oE*o+=|
|         = =.=+oo|
|        S . o  * |
|       .     .o .|
|        . .   oo |
|         o . +.o.|
|       .o   o +o.|
+----[SHA256]-----+

you ll end up with a id_rsa and a id_rsa.pub - the id_rsa is your private key ( you keep this to your self ) the .pub is the pubkey this one can be copied onto servers to authenticate you.
you will be asked to generate a passphrase ( you will be asked to type in this passphrase each time you use this key - so maybe you want to set it to nothing - so you wont be promted ). I currently am using krypt.co ( https://www.youtube.com/watch?v=k2q6A0N-ftY ) still - but with the project having been bought by akami i will most likely revert to a normal ssh keypair soon.
0.1.2. infrastructure as code
Infrastructure as code (IaC) is the process of managing and provisioning systems through machine-readable definition files, rather than physical hardware configuration or interactive configuration tools. think of manually setting up a proxmox server, configuring 20 vms in there and a bunch of software in these 20 vms and then imagine you build a nice configurable ( e.G. version of software ) script for each of these steps and when this script may be useful:
- when you break something and need to “reinstall”
- when you want to test updating some software’s versions
- when you plan on building a second cluster for a client/friend
- when zombies attack and you need to relocate quickly but want to take your setup with you
But do not go overboard - do not try to automate everything too much - just because you can and do not reinvent the wheel and build out everything from scratch with bash scripts - rather use some some mix of IT-ochestration software ( like ansible)/containers/backups and a few manual clicks.
0.1.3. ansible
https://www.ansible.com/ ansible is an “automation platform/it-orchestration software” - in simple words it’s a bunch of python stuff that allows us to configure/manage servers over ssh. if you don’t know ansible i suggest you take a look at the modules that are available for ansible: https://docs.ansible.com/ansible/2.9/modules/list_of_all_modules.html and you might get an understanding how vast ansible’s functionality is.
To get a better understanding of ansible I also recommend this course: https://www.youtube.com/watch?v=goclfp6a2IQ&list=PL2_OBreMn7FqZkvMYt6ATmgC0KAGGJNAN
0.1.4. github account
https://github.com is a place where you can store code/config files in a versioned manner ( so you can go back/forth between versions). we’ll be using github to save our ansible playbooks/roles/configs and most likely use some of it’s automation functionality ( github actions ) to trigger some things.
0.1.5. KVMs vs Containers - when use what and why?
Generally speaking it is far easier to maintain/setup things in kubernetes so the majority of things i ll setup like this using already existing helm charts or docker images. For some things it does make more sense to use kvm’s - for example my emails or my pxe server - where i want a bit more “isolation”.
0.2. network layout

0.2.1. security by compartmentalization
the main principle of the setup i would say is security by compartmentalization. We expect no network/security to be perfect, if we isolate things into different networks the impact of something would be limited to this section of the network.
0.2.2. why a vm at ovh?
You might ask yourself why i have a gateway in frankfurt and in berlin - my ISP uses a IPv6 stack - i have found out that not everybody runs a ipv6 stack at home so it can become difficult for me to get a connection back home. this is why i’ve rented a small vps in frankfurt and it connects to my home opnsense via a openvpn tunnel, then i can receive incoming connections on this host and forward it to my home network ( green line = vpn tunnel ). It also “anonymizes” your home ( to a point … ) - depending on your requirements you might not want/need it.
0.2.3. parts of the network/devices
0.2.3.1. private network
- range: 192.168.178.0/24
- description: my isp’s router ( a fritzbox ) which also creates my internet connection creates a LAN/WAN on the 192.168.178.0/24 range
0.2.3.2. guest network
- range 192.168.179.0/24
- description: the fritzbox creates a second guest network. all devices in this network can use http/https/email protocols. They cannot reach the 192.168.178.0/24 range or other devices within the 192.168.179.0/24 network. They can be reached from devices inside the 192.168.178.0/24 network
0.2.3.3. work network
- range: 172.16.137.0/24
- description: For work i mostly use a laptop with a wired conection to the switch and i also own a “beefy server” that is also connected to the same switch. the server then runs proxmox, a debian based operating system that uses kvm to run multiple virtual machines and manage those virtual machines through a webinterface ( and via ssh ). I’ve picked the 172.16.137.0/24 range which is part of the 172.16.0.0/12 private address space. I’m using this range for my work network as in my experience this range is not used often and thus does not conflict with a lot.
0.2.3.4. ovh network
- range: 10.250.0.0/24
- description: in the ovh network i only picked a /24 network as common with devices reaching the end user i picked a range from the 10.0.0.0/8 private address space. this for starters will only run a opnsense vm and most likely a pihole too.
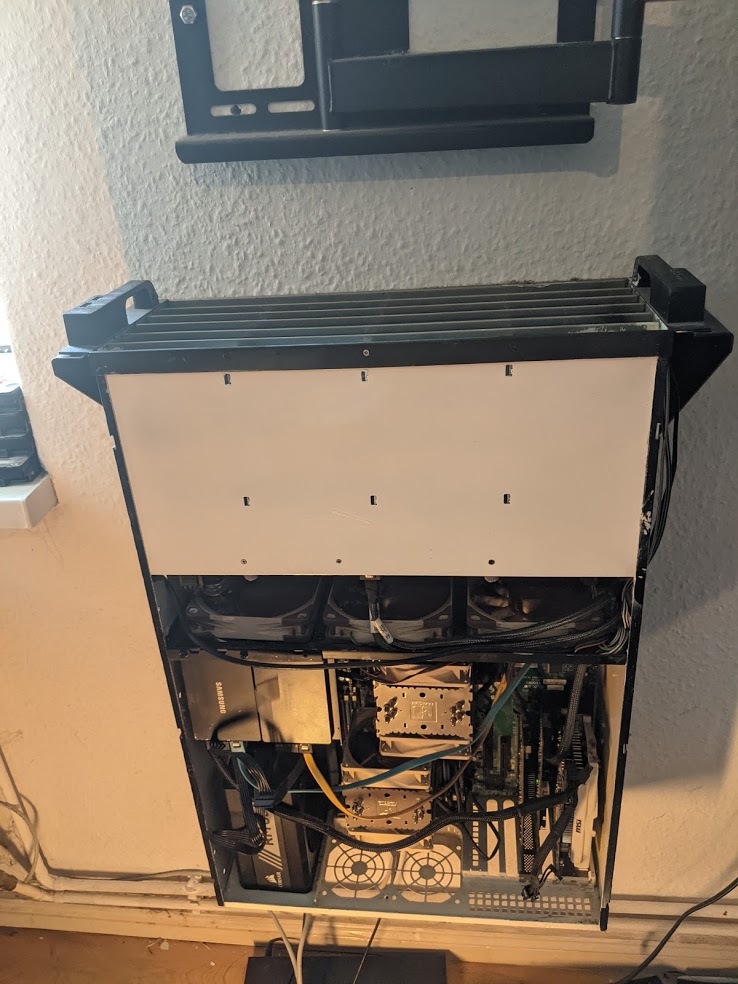
0.2.3.5. homeserver
- name: homeserver
- description: As you can see it’s a 4U Server with 24 * 3.5" hdd slots. For starters i ve added 4 * 4TB disks and 2 SSDs. My mainboard is a Supermicro X10DRi with 2 CPU(s) 16 x Intel(R) Xeon(R) CPU E5-2630 v3 @ 2.40GHz (2 Sockets). At the moment i use 32GB of ram but I can still throw more into the system if I need to - for now my usage is rather “modest” and 32GB are enough for me.
0.2.3.6. opnsense
- name: opnsense-berlin
- description: A few years ago i built this: https://www.youtube.com/watch?v=6Xn9lQgqf2o&list=PLj8EOFaxOgsQb2N5OhTa88e5TjBAIupBE little hardware firewall. I looked for a cheap passively cooled mini atx mainboard that has 2 network cards and found a matching case. the video explains how i setup pfsense - but as technology evolves i have since switched to using opnsense. In the video i also did use a mechanical hard drive - which turned out to emit some noise which annoyed me. So i ve since ripped out that harddisk and installed opnsense on a usb stick. The only thing that is a bit “different” from the normal pc is that this mainboard has 2 NICs ( network interface cards ) - one WAN and one LAN.
1. turning windows 10 into dual-boot manjaro (FullDiskEncryption) / Windows 10
I’m gonna start out same as most people with a windows 10 installation by using the dell’s recovery image: ( https://www.dell.com/support/home/de-de/drivers/osiso/wt64a ) once windows is installed i ll shrink the partition down to 80GB and use the rest for linux and setup a dual boot configuration - in my experience it’s usually easier to have a windows installed and then add the linux next to it.
Change Windows to use UTC: via regedit: in HKEY_LOCAL_MACHINE\SYSTEM\CurrentControlSet\Control\TimeZoneInformation DWORD (32-bit) RealTimeIsUniversal=1
1.1. navigating in i3wm
| keys | description |
|---|---|
| mod + Enter | opens a new terminal window |
| mod + Shift + q | closes selected window |
| mod + d | opens program launcher dmenu |
| mod + q | toggles switching direction |
| mod + (1-8) | change active workspace to 1-8 |
| mod + shift + (1-8) | move focused window to workspace 1-8 and focus that workspace |
| mod + shift + h | view docs of i3 |
| mod + shift + r | reload i3 config |
.i3/config contains your desktop config can be edited easily
1.2. configuration of terminator with zsh/oh-my-zsh and powerlevel10k
1.2.1. installation of terminator
sudo pacman -S terminator
- color tab: source code regular / font size 30
- background: transparent 70%
- i3 config override change terminal to terminator
1.2.2. zsh theme pwoerlevel10k-git
yay -S zsh-theme-powerlevel10k-git
echo 'source /usr/share/zsh-theme-powerlevel10k/powerlevel10k.zsh-theme' >>~/.zshrc
chsh /bin/zsh
1.2.3. changing the default shell to /usr/bin/zsh
chsh $USER
1.2.4 browser installation
yay -S google-chrome brave-bin
1.2.5. pulseaudio
install_pulse
1.2.6. bluetooth audio with bluez
sudo pacman -S pulseaudio-bluetooth
1.2.7. file browser:
sudo pacman -S thunar
alternative:
sudo pacman -S nautilus
1.2.8. define default applications:
sudo pacman -S xfce4-settings xfce4-settings-manager
then head over to the settings manager > Default Applications
1.2.9. set the right time
sudo systemctl start systemd-timesyncd
sudo systemctl enable systemd-timesyncd
1.3. updating your system
pacman-mirrors --status
sudo pacman-mirrors --fasttrack
pacman-mirrors --status
sudo pacman -Syyu

2. setup of two opnsense with openvpn tunnel
2.0 opnsense installation ovh ( public cloud)
at the top left you can select the zone in which to start the virtual machine in.
2.0.1. create ovh virtual network ( 10.250.0.0/24 )
During your account creation with ovh you ll create a ovh handle ( XX1234-ovh or similar ) with that handle you can login to the ovh manager ( https://www.ovh.com/manager ) this interface allows you to manager your subscription with ovh. Once logged into the manager you can click on “public cloud” in the top navigation bar ( https://www.ovh.com/manager/public-cloud/ ). In this tutorial series we ll mostly be using this section of ovh. In this section you can also create credentials for https://horizon.cloud.ovh.net/ which is ovh’s openstack management interface ( similar to the manager but a few more options ).
2.0.2. upload custom opnsense image via ovh’s horizon interface
As a firewall we’ll be using opnsense. in ovh’s horizon interface we have the option to upload or custom images to be used as operating systems. so I’ll head over to https://opnsense.org/download/ download the “nano variant” locally to my laptop to then subsequentally upload it to horizon. the nano variant is designed for usb sticks etc so it will automatically expand.
2.0.3. turn image into volume
2.0.4. create virtual machine at ovh based on volume created in 4.3
2.0.5 network config
route add -inet 1.2.3.4/32 -link -iface vtnet0
route add default 1.2.3.4
2.0.6 run wizzard
2.0.7 allow temp firewall into webui
2.0.8 interfaces disable ipv6
2.0.9 gateway set default gateway to be persistent
2.1. opnsense installation berlin
2.1.1 run wizzard
2.1.2. opnsense configuration ovh
2.1.3 openvpn server on opnsense ovh for tunnel to opnsense berlin
2.2 opnsense configuration berlin
2.2.1. dhcp / dns
2.2.2. openvpn client on opnsense berlin to uplink to opnsense ovh
3. install fully encrypted debian 11 and turn into proxmox 7
3.1. preparing bootable media & installation
cd /tmp
wget https://cdimage.debian.org/debian-cd/current/amd64/iso-cd/debian-11.0.0-amd64-netinst.iso
sudo dd if=debian-11.0.0-amd64-netinst.iso of=/dev/sdX bs=4M status=progress
- encrypted lvm
make sure to replace sdX with the id of your actual usb stick ( sudo dmesg after plugging in the stick )
3.2. turning debian into proxmox
3.2.1. set /etc/hostname & /etc/hosts
we edit hosts file end enter ip
hostname --ip-address
echo "deb [arch=amd64] http://download.proxmox.com/debian/pve bullseye pve-no-subscription" > /etc/apt/sources.list.d/pve-install-repo.list
wget https://enterprise.proxmox.com/debian/proxmox-release-bullseye.gpg -O /etc/apt/trusted.gpg.d/proxmox-release-bullseye.gpg
# verify
sha512sum /etc/apt/trusted.gpg.d/proxmox-release-bullseye.gpg
7fb03ec8a1675723d2853b84aa4fdb49a46a3bb72b9951361488bfd19b29aab0a789a4f8c7406e71a69aabbc727c936d3549731c4659ffa1a08f44db8fdcebfa  /etc/apt/trusted.gpg.d/proxmox-release-bullseye.gpg
apt update
apt full-upgrade
apt install proxmox-ve postfix open-iscsi
apt remove os-prober
- ensure unbound registers dhcp leases
3.2.1. defining sources in /etc/apt/* & updating system
remove pve enterprise enable pve-no-subscription in apt sources.list
apt update && apt dist-upgrade -y
3.2.2. How to turn on PCI Passthrough with Proxmox (IOMMU)
requirements: cpu / motherboard / turned on bios /etc/default/grub
GRUB_CMDLINE_LINUX_DEFAULT="quiet intel_iommu=on"
(for amd change intel to amd)
/etc/modules
vfio
vfio_iommu_type1
vfio_pci
vfio_virqfd
after that we
reboot
3.3. configuration of proxmox
3.3.1. ZFS raid 10 with 4 disks
https://www.youtube.com/watch?v=lsFDp-W1Ks0
fdisk /dev/sdX
d
... ( delete all disks )
w
repeat for all disks
Disks -> ZFS -> Create ZFS Name: archive1 Raid: 10 Comrpession: on ashift: 12 select all disks Create
3.3.2. How to setup SMART monitoring with proxmox
ensure smart is turned on for disks
smartctl -a /dev/sdX
4. creating a openstack cloud template with debian 11 for proxmox
apt update && apt install -y libguestfs-tools

# grab the image
wget https://cloud.debian.org/images/cloud/bullseye/latest/debian-11-nocloud-amd64.qcow2

# Create the instance
qm create 998 -name template-vm -memory 1024 -net0 virtio,bridge=vmbr0 -cores 1 -sockets 1

# Import the OpenStack disk image to Proxmox storage
qm importdisk 998 debian-11-nocloud-amd64.qcow2 local

# Attach the disk to the virtual machine
qm set 998 -scsihw virtio-scsi-pci -virtio0  /var/lib/vz/images/998/vm-998-disk-0.raw

# Add a serial output
qm set 998 -serial0 socket

# Set the bootdisk to the imported Openstack disk
qm set 998 -boot c -bootdisk virtio0

# Enable the Qemu agent
qm set 998 -agent 1

# Allow hotplugging of network, USB and disks
qm set 998 -hotplug disk,network,usb

# Add a single vCPU (for now)
qm set 998 -vcpus 1

# Add a video output
qm set 998 -vga qxl

# Set a second hard drive, using the inbuilt cloudinit drive
qm set 998 -ide2 local:cloudinit

# network in cloud init
qm set 998 --ipconfig0 ip=dhcp

# ssh key for cloud init
qm set 998 --sshkey mykey.pub

# Resize the primary boot disk (otherwise it will be around 2G by default)
# This step adds another 8G of disk space, but change this as you need to
qm resize 998 virtio0 +8G

###
virt-customize -a /var/lib/vz/images/998/vm-998-disk-0.raw --install qemu-guest-agent,cloud-init,cloud-initramfs-growroot
virt-customize -a /var/lib/vz/images/998/vm-998-disk-0.raw --append-line "/etc/cloud/cloud.cfg:runcmd:"
virt-customize -a /var/lib/vz/images/998/vm-998-disk-0.raw --append-line "/etc/cloud/cloud.cfg: - dhclient -r"
virt-customize -a /var/lib/vz/images/998/vm-998-disk-0.raw --append-line "/etc/cloud/cloud.cfg: - reboot"


# Convert the VM to the template
qm clone 998 999 --name template --full true

# convert the clone to a template
qm template 999
5 terraform for further vm creation
- set static lease for homeserver since we hardcoded it to proxmox
git clone https://github.com/loeken/tf-proxmox-demo
cd tf-proxmox-demo
terraform init
terraform plan
terraform apply
6. backups / pxe boot server ( fog project )
proxmox backup proxmox backup scheduling explain pxe in home example for that well be using fog
6.1. prepare a vm for for using terraform
git clone https://github.com/loeken/tf-proxmox-demo
cd tf-proxmox-demo
terraform init
terraform plan
terraform apply
ssh debian@fog-01
6.2. install fog project
sudo -s
apt install -y git
git clone https://github.com/FOGProject/fogproject.git
cd fogproject/bin
git checkout dev-branch
./installfog.sh
2
N ( Type of installation: Normal )
N ( change network )
Y ( setup router address )
Enter ( to confirm the ip: 172.16.137.254 )
Yes ( dhcp to handle DNS )
Enter ( What DNS address should DHCP allow? [172.16.137.254] )
N ( Would you like to use the FOG server for DHCP service? )
N ( international packages )
N ( https )
N ( change hostname )
Y ( are you sure to continue )
6.2. configure opnsense
in opnsense Services > Dhcpv4 > Lan > Enable network booting set next server ip to ip of fog vm filename: undionly.kpxe
10.6. an email server ( postfix/dovecot with ispconfig )
10.7 setting up dns records - dkim/dmarc/spf
10.8. password management with bitwarden
10.9. data-archive backup vm with duplicati as sync client.
11. using k3s ( kubernetes )
11.1. setting up k3s 3 node cluster
11.2. ingress
11.3. home-assistant
11.4. plex media server
11.5. omni
AKietwGqnW4vEv97KA0L
optional:
6.3. turn on dnsmasq DNS
- lan
- strict interface binding
- enable dnsses support
- do not forward private reverse lookups
comments powered by Disqus