Arch Linux 2020 luks cryptsetup systemd-boot installation
the video
the following video shows the whole installation below the video you’ll find the transcript
getting the iso
you can grab the latest archlinux iso from https://www.archlinux.org/download/ download the iso and the matching signature to verify, if you are doing this from a arch you can use:
pacman-key -v archlinux-2020.05.01-x86_64.iso.sig
==> Checking archlinux-2020.05.01-x86_64.iso.sig... (detached)
gpg: Signatur vom Fr 01 Mai 2020 07:33:57 CEST
gpg:                mittels RSA-Schlüssel 4AA4767BBC9C4B1D18AE28B77F2D434B9741E8AC
gpg: Hinweis: Die "trustdb" ist nicht schreibbar
gpg: Korrekte Signatur von "Pierre Schmitz <pierre@archlinux.de>" [vollständig]
if not you can also use gpg
gpg --keyserver-options auto-key-retrieve --verify archlinux-2020.05.01-x86_64.iso.sig
create a bootable image
you can use the tool dd to flash the image to your bootable usb media, plugin the media and run
sudo dmesg
dmesg will tell you the device name of the usb stick you just inserted use the sdX in combination with dd to create a bootable image
dd if=/path/to/arch.iso of=/dev/sdX
boot from the image
you will end up with a prompt as the root user
load your keyboard layout ( i ll be picking the german keyboard layout de-latin1 the default is us layout)
loadkeys de-latin1
verify that uefi has been loaded properly
ls /sys/firmware/efi/efivars
Connect to the internet - most cases you will get an ip via dhcp so lets use dhclient to get an ip.
In most cases this will be dhclient eth0
dhclient enp1s0
update the system clock
timedatectl set-ntp true
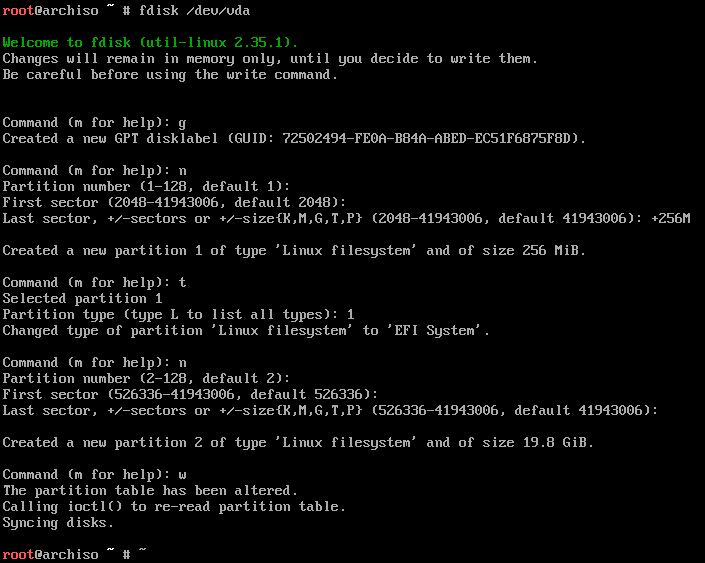
prepare the disk

create encrypted lvm
modprobing dm-crypt which is used to encrypt our disks
modprobe dm-crypt
you can use the following command to find out the throughput of various ciphers
cryptsetup benchmark
next step is to create the encryption il lb e using aes-xts-plain64 with 512 bits
cryptsetup -c aes-xts-plain -y -s 512 luksFormat /dev/vda2
as yt viewer brought to my attention that it might be better to actually use as it also works better with filesystems > 2TB
cryptsetup -c aes-xts-plain64 -y -s 512 luksFormat /dev/vda2
now lets open the container so we can start using the newly created /dev/mapper/lvm device
cryptsetup luksOpen /dev/vda2 lvm
now we are going to create the logical volume groups
pvcreate /dev/mapper/lvm
vgcreate main /dev/mapper/lvm
and now we can create the actual volume groups we ll need one for root and one for the swap, for some people it might be useful to also create one for /var or for /home
lvcreate -L 2GB -n swap main
lvcreate -l 100%FREE -n root main
create the filesystems
mkfs.vfat -n BOOT /dev/vda1
mkfs.ext4 -L root /dev/mapper/main-root
mkswap -L swap /dev/mapper/main-swap
now we can mount the disks
mount /dev/mapper/main-root /mnt
mkdir /mnt/boot
mount /dev/vda1 /mnt/boot
installing the actual base
we are now using pacstrap to install into the /mnt folder where we mounted the lvms to in the last step. ( i have an intel based cpu so i ll be picking the intel-uc package )
pacstrap /mnt base base-devel syslinux nano linux linux-firmware mkinitcpio lvm2 dhcpcd inetutils intel-ucode
syslinux-install_update -i -a -m -c /mnt
in the next step we have to add one of these append lines to each the arch and the fallback definition
/mnt/boot/syslinux/syslinux.cfg
APPEND cryptdevice=/dev/vda2:main root=/dev/mapper/main-root rw lang=de locale=de_DE.UTF-8
make the mounts persistent
we already mounted all partitions except the swap let’s mount the swap now then we can generate an fstab file based on all the mounted partitions
swapon -L swap
now generate the fstab file and verify with cat
genfstab -U -p /mnt >> /mnt/etc/fstab
nano /mnt/etc/fstab
when using an ssd we append to each disk
,noatime,discard
for me this resulted in this fstab file

another youtube user’s comment on this:
You shouldn't use the discard mount option with dmcrypt https://wiki.archlinux.org/index.php/Dm-crypt/Specialties#Discard/TRIM_support_for_solid_state_drives_(SSD)
finishing touches on the installation
the power of chmod - we previsouly installed arch onto /mnt so we now chroot into this directory. so we can start executing commands as if /mnt was our /
arch-chroot /mnt
set the LANG and make it persistent by saving it to the locale.conf
echo LANG=de_DE.UTF-8 > /etc/locale.conf
nwo open the local.gen and uncomment all the languages you plan on using for me it’s de_DE.UTF-8
/etc/locale.gen
de_DE.UTF-8 UTF-8
#de_DE ISO-8859-1
#de_DE@euro ISO-8859-15
afterwards you can regenerate the local files
locale-gen
Generating locales...
de_DE.UTF-8... done
de_DE.ISO-8859-1... done
de_DE.ISO-8859-15@euro... done
Generation complete.
echo KEYMAP=de-latin1 > /etc/vconsole.conf
echo FONT=lat9w-16 >> /etc/vconsole.conf
And now we are going to save our localtime
ln -sf /usr/share/zoneinfo/Europe/Berlin /etc/localtime
Turn on multilib by uncommenting the multilib lines
/etc/pacman.conf
[multilib]
SigLevel = PackageRequired TrustedOnly
require_once = /etc/pacman.d/mirrorlist
and upgrade the packages for multilib
pacman -Sy
now we have to modify the loading of modules/hooks via nano we need lvm2 and encrypt
/etc/mkinitcpio.conf
MODULES=(ext4)
HOOKS=(base udev autodetect modconf block keyboard encrypt lvm2 filesystems fsck)
bake that kernel
let’s generate a new kernel image
mkinitcpio -p linux
define root-passwort festlegen:
passwd
turn on dhcpd so arch will get an ip on the next startup
systemctl enable dhcpcd.service
now we define a hostname and write the /etc/hosts file
/etc/hosts
hostnamectl set-hostname archtest
echo "127.0.0.1 archtest" >> /etc/hosts
bootload systemd
bootctl --path=/boot install
now we are going to edit /boot/loader/loader.conf
#timeout 3
#console-mode keep
now we are going to add an entry to the bootloader config
/boot/loader/entries/arch.conf
make sure you type cryptdevice=UUID= ( two equal signs ) in the next step
title	Arch Linux
linux	/vmlinuz-linux
initrd /intel-ucode.img
initrd /initramfs-linux.img
options cryptdevice=UUID=8ef2ef04-a712-4a5a-84aa-32c4d87cff90:lvm root=/dev/mapper/main-root quiet rw
set a hostname
echo "archtest" > /etc/hostname
echo "127.0.0.1	localhost" > /etc/hostname
echo "::1		localhost" >> /etc/hostname
echo "127.0.0.1 archtest.localhdomain archtest" >> /etc/hostname
leave the chroot umount the disks and reboot
exit
umount /mnt/{boot,}
reboot